PiP Frame template for DaVinci Resolve makes Picture-in-Picture fast and easy.
Drop it on a clip and you get a ready-made PiP window (rectangle or circle) with simple controls for size, position, border, and animations.
Super useful preset for vloggers, tutorial creators, reaction videos, interviews, or anyone who needs a quick PiP (Picture-in-Picture).
What’s in the Download
A ZIP file containing:
- PiPFrame.drfx (one-click install)
- README.txt (guide and usage instructions)
Compatibility
- DaVinci Resolve (Free or Studio) – version 18 or later recommended.
- Works on Windows, Mac, and Linux.
Installation
- Unzip the download.
- Double-click PiPFrame.drfx.
- Click Install (or Overwrite if updating)
- Restart DaVinci Resolve.
- Go to Edit page.
- Find the template under Effects Library → Toolbox → Effects → DvBlend. Or use the search bar.
- Find it listed as PiP Frame.
Key features
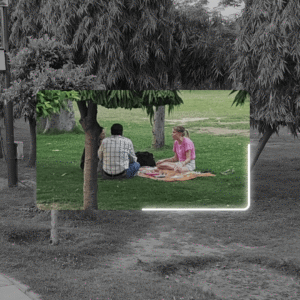
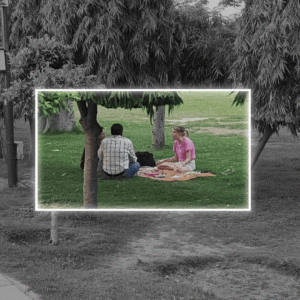
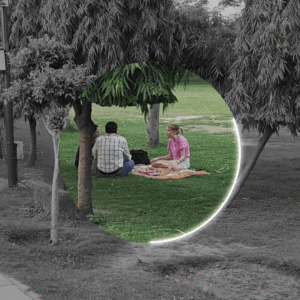
- Shape: Choose Rectangle or Circle anytime.
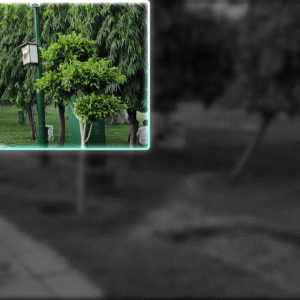
- Frame Controls: Adjust Width, Height, Corner Radius, and Pan (X/Y) to show the right part of your media.
- Content Controls: Scale, Position, Rotate, and Flip (Horizontally/Vertically) the PiP.
- Border: On/Off toggle, Width, Style (Solid/Gradient), Color (RGBA), and Opacity.
- Border Glow: Add glow with adjustable Strength and Size.
- Shadow: Enable realistic shadow with Strength, Angle, Distance, Blur, and Color.
- Animations:
- Pop Animation: Modern pop effect with In/Out toggles and Duration.
- Fade Animation: Smooth Fade In/Out with Duration controls.
How to Use: Step by Step
- Apply the Effect: Drag and drop the PiP Frame effect from the Effect Library onto a clip in the timeline.
- Choose Frame Shape: In the Inspector, select Rectangle or Circle.
- Rectangle: Adjust Width, Height, and Corner Radius for rounded edges.
- Circle: Adjust Size to resize.
- Position the Frame: Use Pan X / Pan Y to show the desired portion of the media inside the frame.
- Adjust Content: Under Content Controls:
- Size: Scale the entire PiP (frame + media).
- Center X/Y: Move the PiP anywhere on the screen.
- Add Border (optional):
- Toggle Border on/off.
- Set Width, Color (RGBA), and Opacity.
- Optional: Enable Border Glow and adjust Gain and Size.
- Add Shadow (Optional): Enable Shadow and tweak parameters for depth behind the PiP.
- Add Animation (Optional):
- Enable Pop and/or Fade animations.
- Choose Pop-In/Out or Fade In/Out.
- Set Animation Duration and preview the clip.
Inspector Controls Explained
- Frame Controls
- Shape: Rectangle or Circle (Rectangle supports rounded corners).
- Width / Height / Size: Scale the mask (0–1 range). Rectangle uses Width/Height; Circle uses Size.
- Corner Radius: Rounds rectangle corners (ignored for Circle).
- Pan X / Pan Y: Move the mask to reveal different parts of the media.
- Content Controls
- Size: Scale the entire PiP (frame + media).
- Center X / Center Y: Move the PiP anywhere on screen.
- Soft Edge: Soften the frame edges.
- Angle: Rotate the PiP.
- Flip: Quick horizontal or vertical mirror.
- Border
- Border (toggle): Turn the outline on/off.
- Border Width: Thickness of the border.
- Type: Solid or gradient color.
- Color: Border color (RGBA).
- Border Opacity: Adjust transparency.
- Border Glow: Add soft glow; adjust Gain and Size.
- Animation
- Pop Animation: Enable/disable pop effect. Toggle Pop-In or Pop-Out independently and adjust Animation Duration.
- Fade Animation: Enable/disable fade effect. Toggle Fade In or Fade Out and adjust Animation Duration.
- Shadow
- Shadow (toggle): Turn drop shadow on/off.
- Strength: Shadow intensity.
- Angle: Shadow direction.
- Distance: How far the shadow is offset.
- Blur: Shadow softness.
- Color: Shadow color (RGB).
Last Update
Date: 27 September, 2025